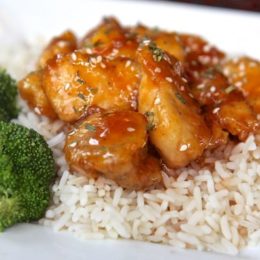
Easy Baked Sweet and Sour Chicken
“Make easy sweet and sour chicken at home that tastes way better than take out! Sticky sweet & sour glaze and tender, juicy chicken! Serve over rice for an easy, quick dinner”
Visual learner? Watch me make this easy sweet and sour chicken from start to finish!
A few weeks ago I broke my rule of never eating Chinese food from a mall. For some reason, I ALWAYS get sick or feel icky afterwards.
I know it’s a mind thing and ridiculous! It all started when I got severe food poisoning from eating teriyaki chicken…twice. I swore mall Chinese restaurants off completely.

Well I was starving, the Chik-fi-la line was a freakin mile long and that Chinese restaurant was smelling divine! So….I did it!!
I ordered some sweet and sour chicken over steamed rice with a side of broccoli. It was sooooo good y’all omg!

Of course this triggered a week long, intense craving for sweet and sour chicken! My normal Chinese spot got shut down after bringing in a deer (google it, long story, but I was bummed)
I tweeted that I HAD TO have my sweet and sour chicken fix ASAP! That’s when one of my subscribers Ming Chen sent me this easy homemade recipe for sweet and sour chicken! I had no idea it was this easy to make!
The kind I had at the mall had a very thick, puffy coating (hardly any chicken in it). This recipe is all chicken and a thin layer of coating, just the way I like it!
It was then I realized that what I had in the mall was..well… nasty!! LOL

BUT THE GAME CHANGES ONCE THIS SWEET & SOUR CHICKE SITS OVERNIGHT!!!
I thought these were pretty doggone good right out of the oven, especially to have such few ingredients. It hits the spot for sure but the very next day!!!!
Sweet Savior! The sauce took on a deeper flavor. From now on, I’ll make this a day ahead. Ok who am I kidding, nobody ever does that! But maybe I’ll do a double batch.
That bright red, artificial tasting glaze I normally ordered didn’t hold a candle to what I created in my kitchen! I know this because I still had a small container of the stuff I got from the mall. Ick! It was pretty much corn syrup and food coloring.

If you love sweet and sour chicken it’s a must that you make it at home, at least once! It’s easy and talk about fresh tasting!
The glaze is sweet and perfectly tart. The chicken is juicy (none of that weird shaped chicken that never looks like the real thing). It was a winner!
The key here is getting the oil hot enough to quickly fry and crisp up the outside of the chicken without cooking the middle! If you can master this then you will have that slight crunch to the outside which to me, is everything! Seriously, throw those thing in the oil, flip them around a few times and then get them out of there!

I had to make this dish about 3 times before I got that part right. Don’t know what my problem was. Even when the chicken wasn’t crisp on the outside it was still delicious and we all loved it, except for Isaac. He was not a fan of something being sweet and sour. Oh well. More for me!!
Get the Recipe: Easy Sweet and Sour Chicken
Ingredients
SAUCE
- 3/4 cup granulated sugar
- 1/3 cup ketchup or chili sauce
- 1/2 cup apple cider vinegar
- 1 tablespoon soy sauce
- 1 teaspoon garlic powder
CHICKEN
- 2 lbs chicken breast, cut into bite-size cubes
- salt & pepper
- 1/2 cup cornstarch, may need more or less
- 2 eggs, beaten
- canola oil, for frying
GARNISH
- sesame seeds
- green onion
Instructions
- Preheat oven to 325 F.
- To make the sauce combine all the sauce ingredients in a large bowl and set aside. (make this a few hours ahead for best results if possible, as sauce gets better as it sits)
- Season chicken generously with salt and pepper.
- Sprinkle chicken with cornstarch and toss until each piece is completely coated.
- Place beaten eggs in a bowl.
- Dip each chicken piece in the egg, let excess drip off and then place on a plate.
- Heat oil until VERY hot in a deep skillet. (Oil must be super hot)
- Fry chicken pieces quickly so that just the outside becomes golden and crisp (about 30 seconds per side. The inside will not be done)
- Place chicken on paper towels to drain.
- Place chicken in a single layer on a baking dish.
- Pour sauce over chicken and toss to coat.
- Bake for about 30 minutes, tossing occasionally.
- Switch the oven to broil and broil until chicken is cooked through and sauce begins to get sticky. (watch carefully as it's easy to burn the chicken during the broiling stage. Be careful not to overcook to prevent drying out the chicken. I always check often) *see note
- When done, plate chicken over rice (if desired) and spoon on the extra sauce.
- Garnish with sesame seeds and green onion.
Notes


Are you telling me in this recipe if I don’t want to broil the chicken the small cut up pieces would take a total of 60 mins? I would think that would either overcook or burn them. Is this correct?
Amazing recipe.. my kids loved it. No chili sauce so I used ketchup and it was delicious.
I absolutely love your recipes. Your entrees, desserts and sides are all delicious.
Sooooo delicious! I used the chili sauce and everything came out so good. Hubby came home with chicken breast the other day and asked me to make more lol
Absolutely delicious!! You were right about making the sauce in advance. I used the chili sauce instead of ketchup and that made all the difference. Thank you this is a new regular for my family.
Wow, just made this recipe for me and my hubby and we loved it! The only thing I would dial back on is the apple cider vinegar, maybe I used too much but I’m probably just sensitive to the taste. Other than that, it was so tasty!!!