Grandma Barb’s Homemade Yeast Rolls Recipe
I will be the first to tell you that when it comes to making anything with yeast from scratch it’s usually an epic fail! I guess I don’t have that delicate, patient bread-makers touch. (I’m learning though) That is why I LOVE this yeast roll recipe.
It is so easy, quick and pretty much error proof. It doesn’t need any tiresome kneading and none of that rolling pin madness. You don’t even need to break out the bread machine. My kinda recipe!!

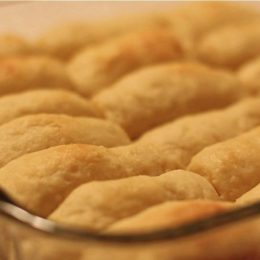
This is the homemade yeast roll recipe that my grandmother uses to make rolls for Sunday dinners and special holidays. They are light, soft and has the perfect mild flavor to accept different types of buttery spreads like honey butter or garlic butter. As soon as these lovelies come out of her oven on Thanksgiving it is the first thing that gets attacked.

So if you are homemade yeast roll challenged like myself, but LOVE the taste of fresh dinner rolls then give this recipe a try!!
Watch me make Grandma Barb homemade yeast rolls from start to finish!
Get the Recipe: Grandma's Homemade Yeast Rolls Recipe
Ingredients
- 3 ¼ cups all purpose flour, divided
- 1 packet of dry active yeast
- 1 ¼ cups milk
- 1/4 - 1/2 cup sugar
- 1/4 cup of butter flavored shortening
- 1 egg
- 1 teaspoon salt
Instructions
- *Preheat oven to 400 degrees when you are ready to bake*
- In a large bowl, add 1 1/4 cup flour & yeast. Mix with whisk until combined. Set Aside
- In a saucepan, over medium heat, add milk, sugar and shortening.
- Stir constantly until shortening has melted. Do not boil. (check on the back of your yeast package to see how hot this liquid needs to be. It's usually between 115-130 degrees F. USE A COOKING THERMOMETER IF NEEDED ) If the mixture is too hot then, let it cool for a bit.
- Pour milk mixture into flour mixture.
- Add in the egg
- Beat on low speed for 1 minute and then on high speed for 3 minutes. (this will help get them light and fluffy)
- Add in the salt and the rest of the flour (2 cups)
- Use your hands or a rubber spatula to mix in the flour until a soft ball of dough forms.
- Grease a bowl with vegetable oil and place the ball of dough into it. Cover and refrigerate for atleast 2 hours.
- Remove from refrigerator & punch down the dough with your fist to release the air.
- Spread a thin layer of melted butter in the bottom of a 9 X 13 pan.
- Take a chunk of dough and form it into your desired shape. (Dip the dough in butter or brush on the butter, and place it into the pan.
- Cover the pan with a thin kitchen towel and let sit in a warm place for at least 1-1 ½ hours. (wait to bake them until you are ready to serve your meal so they will be piping hot! They don't mind hanging out)
- Bake for 10-14 minutes or until golden. Keep an eye on them after 10 minutes. When they come out of the oven brush them with butter. I like to use a light mixture of butter and honey! yummy!
Notes
1.) Make sure your yeast is fresh. Expired yeast or improperly stored yeast will suck majorly! Store yeast in the refrigerator.
2.) Make sure the liquid is warm enough. If it's too hot it will kill the yeast once it's added in. If it's too cold it won't react with the yeast which will result in crappy, crumbly, flat rolls. Check the back of your yeast package to see how hot this needs to be. Your yeast package may suggest 120-130 F. I just think of a nice cup of soothing hot chocolate (not too hot to sip, but not cold either)
3.) If you alter the ingredients then your rolls may have a different texture and taste. I wouldn't suggest trying to replace the shortening with oil and so forth.


So now I’m addicted to these rolls I freeze them and make them ALLLLL the time now!!! Thanks girl
Girl finding your blog has been a blessing and a curse!! I have already gained 10 pounds just be reading it!! Thanks for bring back the homemade recipe’s for the modern family!!
Y’ALL BETTER MAKE THESE ROLLS! I’m fifty and had never used yeast before until I mixed up these rolls last night. I patted them out, put them in the pan and let them rise about four hours. They just came out of the oven. As a previous poster stated, they are like a taste of cloud. I’m so proud, my husband tried them and said they were good. My size-2 daughter ate two right away.These were so easy . Follow each step. I used reg flavored shortening. I happened across this site a few days ago. Yeah, Diva’s bookmarked.
Im trying this out rite now have the dough in the fridge as I type lol it smells wonderfully love the step by step guidance 😀
Hi Monique, I just wanted to ask a question. The recipe says they don’t mind sitting; how long can the sit? I want to make them for Easter dinner, I want to have them hot out of the oven, but I will not have time to mix them after church. If I mix them Sat. evening, will they be okay to sit until after church Sunday morning.
OMG !!!! LOVE ,LOVE ,LOVE, These. They taste how I remember them when I was small. My family will be getting these homemade rolls a lot, they just loved them !
Thanks for sharing.